Message Areas - "'hidden' view mode when driving a route"
Train-Sim.Com Message Areas
"'hidden' view mode when driving a route"
Email this topic to a friend
Printer-friendly version of this topic
Bookmark this topic (Registered users only)
Previous Topic | Next Topic Conferences MSTS Route Design (Protected) Original message
Jules74 (33 posts)
Jul-28-01, 02:39 PM (EST) "'hidden' view mode when driving a route" I don't know how I figured this one out but whilst exploring maria's pass I pressed ctrl + keypad-plus and there I was presented with red squares around objects in the route and on every car. The odd thing is that they don't appear on every object or track piece. Like, they don't appear on dynamic track pieces.
Does anybody have a clue as to what this special viewmode might mean? I couldn't find anything in the docs. Alert Edit | Reply | Reply With Quote | Top
Table of Contents
Subject Author Message Date ID RE: 'hidden' view mode when driving... Lifeguard_gf Jul-28-01 1 RE: 'hidden' view mode when driving... ccyko Jul-28-01 2 RE: 'hidden' view mode when driving... JMSteven_W98 Jul-29-01 3 RE: 'hidden' view mode when driving... jmw Jul-29-01 4 RE: 'hidden' view mode when driving... JMSteven_W98 Jul-29-01 7 RE: 'hidden' view mode when driving... Familton Jul-29-01 5 RE: 'hidden' view mode when driving... JMSteven_W98 Jul-29-01 6 RE: 'hidden' view mode when driving... Familton Jul-29-01 8 RE: 'hidden' view mode when driving... DKlemm Jul-29-01 9 Shape, Shape Descriptions and Textu... JMSteven_W98 Jul-29-01 13 RE: 'hidden' view mode when driving... Familton Jul-29-01 10 RE: 'hidden' view mode when driving... DKlemm Jul-29-01 11 RE: 'hidden' view mode when driving... Familton Jul-29-01 12 RE: 'hidden' view mode when driving... JMSteven_W98 Jul-29-01 14 RE: 'hidden' view mode when driving... Familton Jul-29-01 15 Activating UFO Shape - Complete Ins... JMSteven_W98 Jul-29-01 16 RE: Activating UFO Shape - Complete... Familton Jul-29-01 17
Lobby | Topics | Previous Topic | Next Topic
Messages in this topic
Lifeguard_gf (70 posts)
Jul-28-01, 04:31 PM (EST) 1. "RE: 'hidden' view mode when driving a route" your a genious i wonder if MS knew that was there. It could be an easter egg. Remove | Alert Edit | Reply | Reply With Quote | Top
ccyko (105 posts)
Jul-28-01, 08:58 PM (EST) 2. "RE: 'hidden' view mode when driving a route" it's a Microsoft "random" features... like those Windows lockups, and general protection faults Remove | Alert Edit | Reply | Reply With Quote | Top
JMSteven_W98 (131 posts)
Jul-29-01, 01:24 AM (EST) 3. "RE: 'hidden' view mode when driving a route" You didn't find any Easter Egg. That's a direct X thing you're seeing. You can also do it in Age Of Empires or most games that use the Direct Draw API.The red regions in Train Simulator are bounding boxes for specific object types. Look at the ESD information in the shape's SD file and you will find out what you're seeing.There are many commands and switches available in the game. I use the CONSOLE mode to interactively program the game engine. You need the debugging kernel for the operating system (standard DLL's won't work) and a terminal connected to an auxillary port.Among the items available in this mode are memory resizing, texture cleanup, texture loads and the normal debugging things like "Memory allocated, Memory for terrain, memory for dynamic objects, etc."The train Sim easter egg involves the UFO flying saucer shape that you'll find in the USA2 folder.
Jim Steven, MCSE
Sr Microsoft Windows Application Developer Remove | Alert Edit | Reply | Reply With Quote | Top
jmw (12 posts)
Jul-29-01, 08:48 AM (EST) 4. "RE: 'hidden' view mode when driving a route" Please expound upon "I use the CONSOLE mode to interactively program the game engine." Remove | Alert Edit | Reply | Reply With Quote | Top
JMSteven_W98 (131 posts)
Jul-29-01, 02:27 PM (EST) 7. "RE: 'hidden' view mode when driving a route" All games have a console interface since you can't easily debug graphical software if the graphical image occupies the whole screen.The console modes in Microsoft games are NOT documented since most end users would get themselves into trouble using them. So I will not detail it here, but will say that the console mode is a way to run pieces of the game, directly view or change memory contents and enables additional commands that have little use within a runtime environment.For instance, you can jump to a specific main line station and resume the game from there without actually following the rails. You can set a breakpoint to right before a train car follows a curved track to see why wheel trucks don't bend the way they should when rendered.Windows programming is identical - you use two monitors and display source code on one screen while viewing the results on another screen. You can single-step through routines and see things that may happen too fast at "runtime speeds".
Jim Steven, MCSE
Sr Microsoft Windows Application Developer Remove | Alert Edit | Reply | Reply With Quote | Top
Familton (95 posts)
Jul-29-01, 01:06 PM (EST) 5. "RE: 'hidden' view mode when driving a route" Hi. Is there a way to add the UFO to activities? Thanks, Bob. Remove | Alert Edit | Reply | Reply With Quote | Top
JMSteven_W98 (131 posts)
Jul-29-01, 02:17 PM (EST) 6. "RE: 'hidden' view mode when driving a route" The UFO does not include a SHAPE DESCRIPTION file, so you
must create your own SD file for it.It's about the size of the TURNTABLE object, so that file works as a template. Copy the following text using WORDPAD:SIMISA@@@@@@@@@@JINX0t1t______
shape (US2UFO.s
ESD_Detail_Level ( 10 )
ESD_Alternative_Texture ( 1 )
ESD_Bounding_Box ( -4.16591 0 -4.16591 4.16591 23.0337 4.16591 )
)Save this file as a Shape Description file named US2UFO.SD in the Shapes folder where you want to see it.Copy the file US2UFO.S from the USA2\Shapes folder to the shapes folder in the route you want to use.Copy the file US2UFO.ACE from the USA2\Textures folder to the Textures folder in the route you want to use.Edit the "REF" document for that route and insert this text using WORDPAD:Static (
Class ( "Aliens" )
FileName ( us2ufo.s )
Shadow ( None )
Align ( None )
Description ( "Flying Saucer, UFO" )
Anim()
)Save the REF document. The SD file will allow the Route Editor to create a thumbnail file from the ACE texture image.In my example, the object category is "ALIENS" so it displays in the route editor as the first object.To comment the shape out in the file, change the word "STATIC" to the word "SKIP" so it looks like this:Skip (
Class ( "Aliens" )
FileName ( us2ufo.s )
Shadow ( None )
Align ( None )
Description ( "Flying Saucer, UFO" )
Anim()
)Anything named SKIP remains in the file but is treated as a comment.If you add this to "CARSPAWN.DAT", you'll see the UFO's along your route roads. You can also give it the Class "Buildings" and place it on terrain like a building.UFO selection in the Route Editor (Mine uses "Vehicles")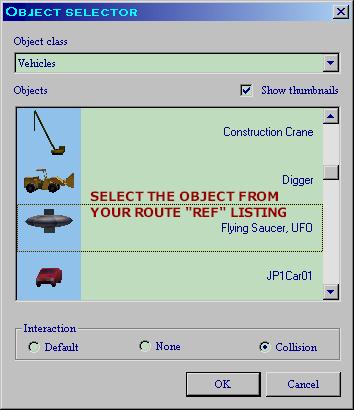 UFO placed on a section of a simple train yard:
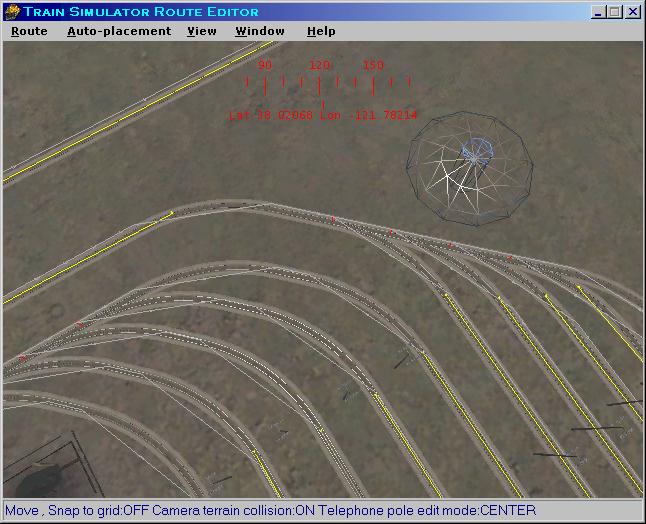 UFO properties that enable animation and detail:
 The "3-D shaded" UFO just before it flies away for awhile:
 The shape flies away every so often and follows a vector that wraps around the route. It returns to where you placed it when complete.The "Easter egg" is a bit different, but still uses the UFO.Jim Steven, MCSE
Sr Microsoft Windows Application Developer Remove | Alert Edit | Reply | Reply With Quote | Top
Familton (95 posts)
Jul-29-01, 02:58 PM (EST) 8. "RE: 'hidden' view mode when driving a route" Hi Jim. Thanks. I'll try it. Regards, Bob. Remove | Alert Edit | Reply | Reply With Quote | Top
DKlemm (185 posts)
Jul-29-01, 03:51 PM (EST) 9. "RE: 'hidden' view mode when driving a route" Jim:I'll put most of my comments questions over in the other thread on your files. But one quick question on the Alien ship. If I undertand, not having an .sd means I don't get a thumbnail correct? But I still can use the object in MSTS correct? Finally, you mention using wordpad, do I save it as a unicode document? David Remove | Alert Edit | Reply | Reply With Quote | Top
JMSteven_W98 (131 posts)
Jul-29-01, 06:13 PM (EST) 13. "Shape, Shape Descriptions and Textures" There are three file types used in the Route Editor:Shape file: This is a binary conversion of the 3D Studio file type. The file contains X,Y,Z information needed to define the major path nodes for a shape. (So a human's shape might be just a wire frame "stick figure")Texture File: This is a UNICODE format file that the shade rendering interface uses to apply surface textures, shadows and lighting effects to the "S" file.It may also contain Extended Shape information needed when a single shape has MULTIPLE texture options.It may also contain Extended Shape information describing the rectangular bounding box for the overall shape. This rectangular box might be used in determining whether two shapes overlap or intersect, such as a car and a train engine. If they intersect and both objects ALSO have "collision" turned on, the train will hit the car.Since the SD file tells the software how to apply a texture to the vector map, it can also create thumbnail images in the Object list box.If a route REF file includes a "S" file reference, the editor will look in the route-specific SHAPES folder for the file.If it finds the file, it reads the header and determines if that object needs an SD file (some don't). If it determines the object needs an SD file, it looks for the file in the shape folder and uses the same prefix (shape file name).If it finds the SD file, it then looks at the SD file information. If that information indicates the shape has multiple textures, the software checks the current conditions (night, snow, season, rain, etc) to determine what shape texture to apply.Jim Steven, MCSE
Sr Microsoft Windows Application Developer Remove | Alert Edit | Reply | Reply With Quote | Top
Familton (95 posts)
Jul-29-01, 04:00 PM (EST) 10. "RE: 'hidden' view mode when driving a route" Hi Jim. I did everything you stated and got down to the carspawn section. I am confused. I don't know anything about the Route Editor. Do I have to use it or can I just edit my carspawn.dat file? My present file is:
SIMISA@@@@@@@@@@JINX0v1t______9
CarSpawnerItem( "car1.s" 4 )
CarSpawnerItem( "car2.s" 4 )
CarSpawnerItem( "car4.s" 4 )
CarSpawnerItem( "policePHIL.S" 6 )
CarSpawnerItem( "truck1.s" 13 )
CarSpawnerItem( "van_1.s" 6 )
CarSpawnerItem( "US2Pickup.s" 6 )
CarSpawnerItem( "car1.s" 13 )
CarSpawnerItem( "car4.s" 13 )
)
Can I just add the us2ufo.s here and change the 9 to 10? What is the last number in each line, I assume it is how many times you want to see the object? Sorry for all my stupidity. Thanks, Bob. Remove | Alert Edit | Reply | Reply With Quote | Top
DKlemm (185 posts)
Jul-29-01, 04:07 PM (EST) 11. "RE: 'hidden' view mode when driving a route" I just copied the carspawn.dat file from Jim's zip to my route.
Didn't cut and paste.David Remove | Alert Edit | Reply | Reply With Quote | Top
Familton (95 posts)
Jul-29-01, 04:34 PM (EST) 12. "RE: 'hidden' view mode when driving a route" Hi David. Where is Jim's zip? I didn't see it. Did you get the UFO to fly in a route without having to use the Route Editor? I did as Jim suggested and got to the carspawn section and got lost. I don't know how to use the Route editor. I tried but never found the Object Selector. Please elaborate as to what exactly you did. Thanks, Bob. Remove | Alert Edit | Reply | Reply With Quote | Top
JMSteven_W98 (131 posts)
Jul-29-01, 06:22 PM (EST) 14. "RE: 'hidden' view mode when driving a route" Bob -
YOu will need the route editor to place the object somewhere on your map, but you can edit the CARSPAWN file manually.You can also create a new category name (anything you want it to be) The ZIP file you're reading about is a set of 12 files I posted here that enable using 1100 objects in the Route Editor instead of the standard limited set.Drawback is you'll need to copy many S, SD and ACE files manually because scripts are different in Windows 9x, ME, NT, 2000 and XP. Jim Steven, MCSE
Sr Microsoft Windows Application Developer Remove | Alert Edit | Reply | Reply With Quote | Top
Familton (95 posts)
Jul-29-01, 08:08 PM (EST) 15. "RE: 'hidden' view mode when driving a route" Hi Jim. Thanks. Is the file in the downloads section? Should I edit my carspawn file,like I asked in the message above,before trying the Route Editor? I really wantthe UFO. Thanks, regards, Bob. Remove | Alert Edit | Reply | Reply With Quote | Top
JMSteven_W98 (131 posts)
Jul-29-01, 10:13 PM (EST) 16. "Activating UFO Shape - Complete Instructions" Step 1 - Select one route map where you want to see the UFO shape. For this example, I will use the route name "BayArea".Step 2 - Open a Windows Explorer window and have it display the folder for your selected route. For my example, the folder is D:\Games\TrainSim\Routes\BayAreaThese windows are much easier to work with if you select "Details" instead of "Large Icons", but that is your choice.Step 3 - Activate the MS Windows "Find files or folders" utility. There are many ways to do it. Here's one path in the start menu START->Find->Files or foldersStep 4 - In the "Name & Location" tab of "Find" add these items: Where you see the word "Named:" type the text us2UFO
Do not include a file extension or the dot character. Where it says "Look in:" type the drive letter and folder name for all your train simulator routes. On my system, Train Simulator is in D:\Games\TrainSim, so I enter this text:
D:\Games\TrainSim\RoutesStep 5 - Click "Find Now" or press ENTER to start the search.Step 6 - Your results should display two files. Both are part of the shipping route "USA2" but they're not active in that route's REF file - and there's a file missing anyway.
US2UFO.S is the UFO shape and US2UFO.ACE is the image.Step 7 - Since the Find files or folders window is the same thing as any Explorer window, you can right-click files shown in that window and copy them to some other place. You never need to open a second Explorer window.a) Right click the "US2UFO.S" file that find shows on screen.
b) The Explorer context menu displays. Select "COPY" in this list.
c) Select the previously opened "chosen route" folder that we opened in Step 2.
d) Locate the folder named "Shapes" here. For my example the full path is D:\Games\TrainSim\Routes\BayArea\Shapes.
e) Right-click the folder named shapes to display the context menu. This time, select "PASTE" from the list.Since the last Explorer shell context menu command was a COPY from the Find files window, this command makes a duplicate copy of the USA2\Shapes\US2UFO.S file in your route's shapes folder.8) Go back to the active Find Files window and highlight the US2UFO.ACE texture file.a) Right-click the "US2UFO.ACE" texture that find shows on screen.
b) The Explorer context menu displays. Select "COPY" from this list.
c) Select the previously chosen "route folder" that we used for the "shapes copy".
d) This time, locate the folder named "TEXTURES". On my system, the full path is D:\Games\TrainSim\Routes\BayArea\Textures
e) Right-click the folder named TEXTURES to display the context-menu again. Select PASTE from the list.If you look at your Find window now, you will see four files instead of just two. That is your confirmation that the file copy really happened.
Step 9 - Creating a Shape Description.
Reselect the Find files utility window, and change the file name we want from "US2UFO" to this US2TURNTABLELeave the directory name the same and start the search. It should display at least five files that have that name. We are only interested in one named "US2TURNTABLE.SD"Right click the file US2TURNTABLE.SD and select COPY from the menu. (You could also use "CTRL+C" to copy and "CTRL+V" to paste)Step 10 - Reactivate the Explorer window where we have been pasting the copies to, but this time, go ahead and open the "SHAPES" folder.On my system it is D:\Games\TrainSim\Routes\BayArea\ShapesRight-Click somewhere in that window where there is no text - somewhere on the window background. Choose PASTE from the menu.The copy should go to the end of the file list in that window by design.Find that file in the window so we can open it with WordPad, but don't open it yet.Change the file name from US2TURNTABLE.SD or "Copy of Us2TurnTable.sd" if you already had one. The new name will be US2UFO.SD
Open the file with WordPad. If you haven't made an association for SD file types, you can press SHIFT and LEFT-CLICK the file name to display the "Open with" dialog box. Type the letter "W" to quickly scroll to WordPad in the list. You can choose to make that the default editor for SD files or remove the check box to leave the file as an unknown type.On my system, I have previously created a shortcut to WordPad in the "C:\Win98\Send To" folder, so I can right-click ANY file and open it in Word Pad without changing the default associations.You will see a bunch of data describing the turntable that I used when I created a working model (another topic for later).Please Select the information shown below and use CTRL+C to copy it to your clipboard:shape (US2UFO.s
ESD_Detail_Level ( 10 )
ESD_Alternative_Texture ( 1 )
ESD_Bounding_Box ( -4.16591 0 -4.16591 4.16591 23.0337 4.16591 )
)
Go back to Word Pad and put the cursor on the line AFTER the first one. Leave line ONE with the SIMIS thing on it.Highlight the whole file except that first line and press CTRL+V to paste in my text for the shape information.Save the file and close Word Pad.You now have a Shape file, a Shape Description file and a Texture file for a single textured image.One more step to go and we're done.Locate the route "REF" document. For my example, I'll use this path D:\Games\TrainSim\Routes\BayArea\BayArea.REFOpen the file in WORDPAD and scroll the file to the very bottom.Copy the lines below that start with the "STATIC(" line and end with the closing ")" shape.Static (
Class ( "Aliens" )
FileName ( us2ufo.s )
Shadow ( None )
Align ( None )
Description ( "Flying Saucer, UFO" )
Anim()
)Paste that text into WordPad as it displays here.
Make sure the closing parenthesis of the item BEFORE this one is still there and that this item has a closing one.Save the file and close Word Pad.WordPad shares a DLL that the Route Editor also uses (the OLE32 stuff) and you can crash if they're both open.Start the Route Editor and retrieve the route you modified.You should see the spaceship as the very first item in the object list.
BTW - The reason I had you use an existing SD file and empty it is to bypass WordPad's bad habit of adding "TXT" to new Unicode document names. You would have created "US2UFO.SD.TXT" without knowing it happened.Jim Steven, MCSE
Sr Microsoft Windows Application Developer Remove | Alert Edit | Reply | Reply With Quote | Top
Familton (95 posts)
Jul-29-01, 11:40 PM (EST) 17. "RE: Activating UFO Shape - Complete Instructions" Hi Jim. Thanks for the GREAT tutorial. I appreciate it! Now if I could only figure out the Route Editor I'd be home free. Thanks and best regards, Bob. Remove | Alert Edit | Reply | Reply With Quote | Top
Lock | Archive | Remove
Lobby | Topics | Previous Topic | Next Topic
Restored from the Train-Sim.Com archive, captured August 31, 2001. About this archive.