Message Areas - "Terrain Textures, the Key to realistic scenery?"
Train-Sim.Com Message Areas
"Terrain Textures, the Key to realistic scenery?"
Email this topic to a friend
Printer-friendly version of this topic
Bookmark this topic (Registered users only)
Previous Topic | Next Topic Conferences MSTS Route Design (Protected) Original message
timken (173 posts)
Dec-02-01, 02:36 PM (EST) "Terrain Textures, the Key to realistic scenery?"  I am trying to make my favorite scene, the Moclips branch of the NP where it runs along the ocean. There is heavy rock "Rip Rap" to protect the bank below the track, and raw soil with slumps along the cut. The terrain texture I made isn't quite right yet, the widths of the some of the textures have to change a bit, but I'm getting there! The track placement in regards to the tiles is critical for this to work!, so the texture can sit right. The texture I made is 512 square, but I reduced it to show what it looks like.Steve Alert Edit | Reply | Reply With Quote | Top
Table of Contents
Subject Author Message Date ID RE: Terrain Textures, the Key to re... LocoRo Dec-02-01 1 RE: Terrain Textures, the Key to re... SR1950 Dec-02-01 2 RE: Terrain Textures, the Key to re... timken Dec-02-01 3 RE: Terrain Textures, the Key to re... ExpressMark Dec-07-01 10 RE: Terrain Textures, the Key to re... JohnCS Dec-07-01 11 RE: Terrain Textures, the Key to re... Hobart Dec-02-01 4 RE: Terrain Textures, the Key to re... JohnCS Dec-05-01 8 RE: Terrain Textures, the Key to re... JohnCS Dec-06-01 9 RE: Terrain Textures, the Key to re... CSXALine Dec-03-01 5 RE: Terrain Textures, the Key to re... KngtRider Dec-03-01 6 RE: Terrain Textures, the Key to re... timken Dec-03-01 7
Lobby | Topics | Previous Topic | Next Topic
Messages in this topic
LocoRo (294 posts)
Dec-02-01, 03:16 PM (EST) 1. "RE: Terrain Textures, the Key to realistic scenery?" Very nice MSTS is getting better and better, now even the landscapes !perfect greetings Roland Remove | Alert Edit | Reply | Reply With Quote | Top
SR1950 (62 posts)
Dec-02-01, 04:19 PM (EST) 2. "RE: Terrain Textures, the Key to realistic scenery?" Wow! That looks great, Steve!! Terrain manipulation is still a mystery to me! Do I understand correctly that you have to align the track/cut/fill parallel to an edge of the terrain grid squares?? From your picture it would seem so.That's a bummer - I'd like to put some rock or dirt on the slopes of my canyon cuts, and they meander like a drunken sidewinder! The canyon walls below are some of the gentler slopes!  My "blank" route looked like one huge golf course, until I tripped over the way to change tile terrain and gave it some more rugged texture - but you have to do the whole tile! But I'm still plugging away!Lew
Remove | Alert Edit | Reply | Reply With Quote | Top
timken (173 posts)
Dec-02-01, 05:08 PM (EST) 3. "RE: Terrain Textures, the Key to realistic scenery?" I think on rugged and twisting track, the only way would be to get screen grabs from straight above in the route editor with the grid showing. Then you can make your terratex bitmaps to fit the track. Just make sure the textures on the edges match the next one in both position and color! Also, remember that they go on flat from the top, so anything vertical will be stretched. Just take that into account, maybe compressing rocks that you use, in the plain that will be vertical. Once you get the hang of it, it really isn't very difficult, considering how cool it looks! I'm still experimenting, but suspect that, just like a fine model railroad, it takes some time to make it right. Although I've ordered Trainz, and look forward to it, I think MSTS can rival or better it in scenery, to say nothing of Steam engines.Steve Remove | Alert Edit | Reply | Reply With Quote | Top
ExpressMark (72 posts)
Dec-07-01, 12:12 PM (EST) 10. "RE: Terrain Textures, the Key to realistic scenery?"
Actually, placing along an edge only is un thinkable if you are making a real world route. So, to answer the question about adding to their slopes and canyons that wind like a snake....all I can say is, no problem. In my LTV Route, for example I have a 2% grade that is over 8 miles long. It is the very snake you mention of. However, it is almost all Rock Cuts all the way down. Not only was I able to follow the track layout as it was, but, it is nearly seamless (NOTE I said NEARLY). IF yoou desire and wish to spend more time you probably could make it 100% seamless.
FOr the most part though I was quite succesful there.
I have read in this thread several methods of doing this, only one was close to the Method I used. It has been said you need to over the Grid and take a screen shot...actually I found that to time consuming...and the results were not as accurate as I would like. I will tell you why..... as you are looking above you are not really seeing the terrain for what it is, if it is a cliff or rock side..from above that except for shadow disapears. I have found a lower 45 degree camera angle works better as you can see exactly where one part of the terrain is a little higher than the other. Then what I do is a Grid Method...but not the pixel idea I read here. I use a simpler aproach...well simplar for me any way. I devide the terrain up with a Grid......here is how I use the grid.First I build all my textures from the base...which is the Default terrain.I take the default Terrain and add the Grid, then While it is in PSP I save it as a BMP and convert it as an ace file....I call mine Grid.ace I then Hit F7 in the editor and insert the texture into the texture selector and hit the grid I want to make a specific texture for.... Then I put the Grid on that texture and roate if needed so that the numbers on my grid face me as they should. Then I notice where the track enters at what Grid Numer.....then where it exits at what Grid Number.... I also see what Grids it crosses through the middle....
I then go back to PSP with that information....and with my Grid on a separate layer I work on the Base layer which is my terrain textures and use what ever texture I am apply to mae a few marks on the terrain then I save it as a BMP convert it as an ace file, then insert it into the texture selector in the editor and insert into the terrain. I usely right away can see if it matches up and most times its 100%.
This Method can be used on any winding track you want..and it works great.Take a look at the LTV Route and you will see just how well it worksHope this has been helpMark Branscum
3DTrains.com Remove | Alert Edit | Reply | Reply With Quote | Top
JohnCS (195 posts)
Dec-07-01, 11:30 PM (EST) 11. "RE: Terrain Textures, the Key to realistic scenery?" Mark:Use the pencil tool, its much easier IMHO. Here's how I do it:1)Copy and or create your default texture which all the tiles will consist of.2) Make several copys of this uncompressed ace file for as many different tile patches as you need to cover a given feature. Give them any names, such as A1.ace, a2.ace,a3.ace (aaa works nice since it shows up first in the dir) Copy them all and give them a second set of names, ie a1a.ace, a2a.ace, a3a.ace.3) assign each a1,a2,a3 ace file to ONE of your tile patches.4) using the pencil tool, draw the outline where you want to insert your features.5) save the route, but when asked to save the modified aces DON'T select the a1,a2,a3 files, use the a1a, a2a alternates. The editor doesn't seem to like saving over the same file, doesn't seem to like creating a new one, and this way you don't overwrite your original for re-use next time.6) Convert the aces to bmps. TGAtools sounds like it does this, or I posted a tool which will for 256x256 ones.7) open the bmps into PSP or equivalent. I merge them into 1 large 10x10 patch bitmap. Use the pencil outlines to create a mask into which your texture is inserted.8) copy your final merged terrain bitmap back into 256x256 patches and covert to aces.They will all line up, and you can get the edges pixel perfect to align exactly on terrain triangle edges if you desire.Here is an example image from the RE:  The textures look blocky from above, however they align with the top edges of the cuts and look pretty good IMHO from the engine view. See the old crawford hill archived topic as evidence. Remove | Alert Edit | Reply | Reply With Quote | Top
Hobart (45 posts)
Dec-02-01, 05:57 PM (EST) 4. "RE: Terrain Textures, the Key to realistic scenery?" Hey All,
Does anyone know how to make their own tranfers? If so you could place tranfers over the regular terrain to get around curves and stuff. I need some rocks for my route but I don't like the 4 or 5 transfers that I've got. To make a terrain tile line up to the track seems like too much work.Best regards
Hobart Remove | Alert Edit | Reply | Reply With Quote | Top
JohnCS (195 posts)
Dec-05-01, 11:57 PM (EST) 8. "RE: Terrain Textures, the Key to realistic scenery?" Custom transfers are easy, just right click them and change the ace filename.Creating terrain features with them is not. Getting the overlap between textures is tricky (it is based upon their order in the world file), and they suck framerate like there's no tomorrow.However making custom terrain textures to match where YOU want the tracks to be isn't that tough. You just need to learn how to use the pencil tool, and some way to comvert ace files into an image you can edit. Now where would I find such a tool? Remove | Alert Edit | Reply | Reply With Quote | Top
JohnCS (195 posts)
Dec-06-01, 03:34 PM (EST) 9. "RE: Terrain Textures, the Key to realistic scenery?" Here's an old photo which shows custom terrain textures which curve to match the track, and which align with the geography instead of aligning the geography with the texture.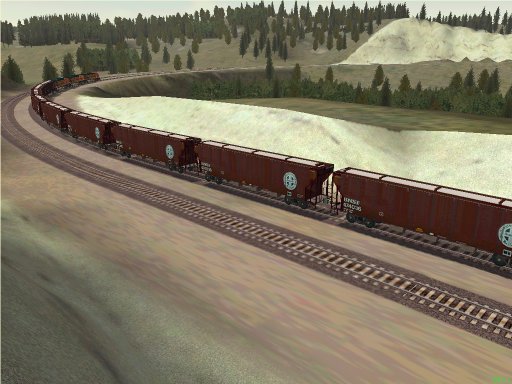 Remove | Alert Edit | Reply | Reply With Quote | Top
CSXALine (360 posts)
Dec-03-01, 02:22 AM (EST) 5. "RE: Terrain Textures, the Key to realistic scenery?" Can these textures be repeated or at least blended in with the existing ones, this could add tremendously to file size unless we totally replace the existing terrain textures with new ones (not a bad idea) just got to figure out how to make themJason Webb
The Seaboard Coast Line/CSX A Line from Tampa Florida to Jacksonville, FL
http://sclcsxaline.cjb.net/
Remove | Alert Edit | Reply | Reply With Quote | Top
KngtRider (148 posts)
Dec-03-01, 03:57 AM (EST) 6. "RE: Terrain Textures, the Key to realistic scenery?" paint shop pro can make seamless patterns/textures afaikits beens a while since i used that feature********************************
Dominic SharooWebmaster/Technical Editor
http://www.nitroware.net
******************************** Remove | Alert Edit | Reply | Reply With Quote | Top
timken (173 posts)
Dec-03-01, 08:32 AM (EST) 7. "RE: Terrain Textures, the Key to realistic scenery?" It is worth it to use the TGATool2 to make bitmap copies of the original textures. Then you can either copy the edges and "mirror" them on your new texture, or just copy the whole texture onto a larger canvas, blend it seamlessly, then cut out the 512 or 256 pixel square image you want for the new texture. They can be blended much more invisibly than Kuju/MS's. I'm making a grid texture marked in pixels that I can lay down, screanshot from above with track in place, then go to repainting a tile more accurately. Note, I'm only doing this in special places that I want as close to exact (to the original scene) as I can get them. High detail arial photos would sure be nice!By making sure that a transistion, like rock/grass, is at the same point on both sides, say pixel 200, new textures can lay side by side. Make one edge, then select just the 50 or so pixel wide band of the edge, copy and paste it to the other side, then use the mirror function in PSP. Paint between, and you have tiles that match side to side.Steve Remove | Alert Edit | Reply | Reply With Quote | Top
Lock | Archive | Remove
Lobby | Topics | Previous Topic | Next Topic
Restored from the Train-Sim.Com archive, captured December 20, 2001. About this archive.